 Save
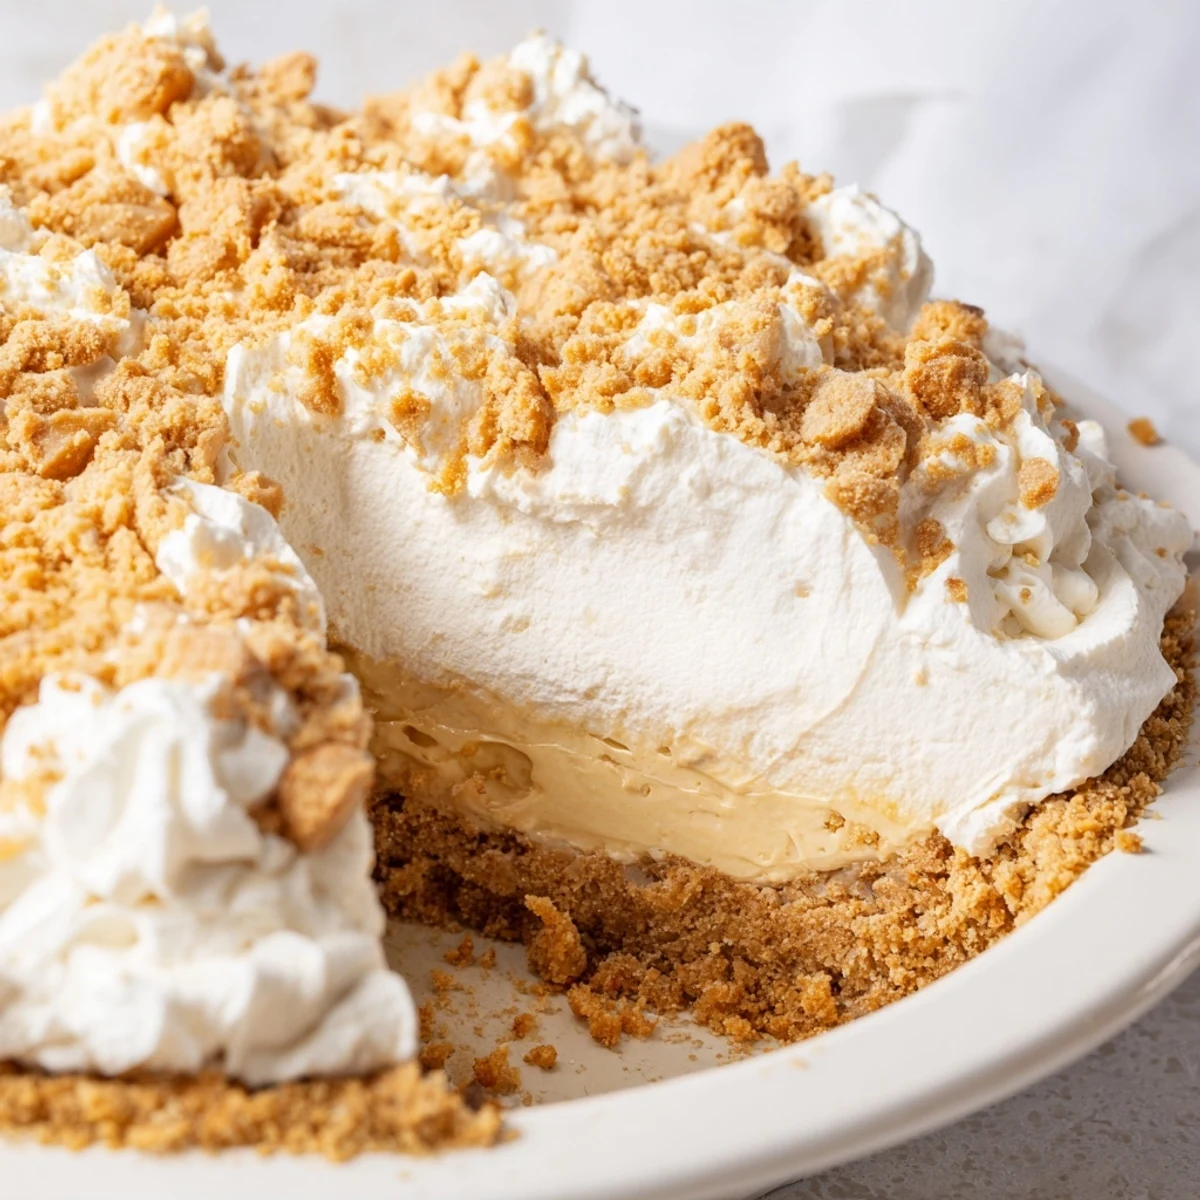
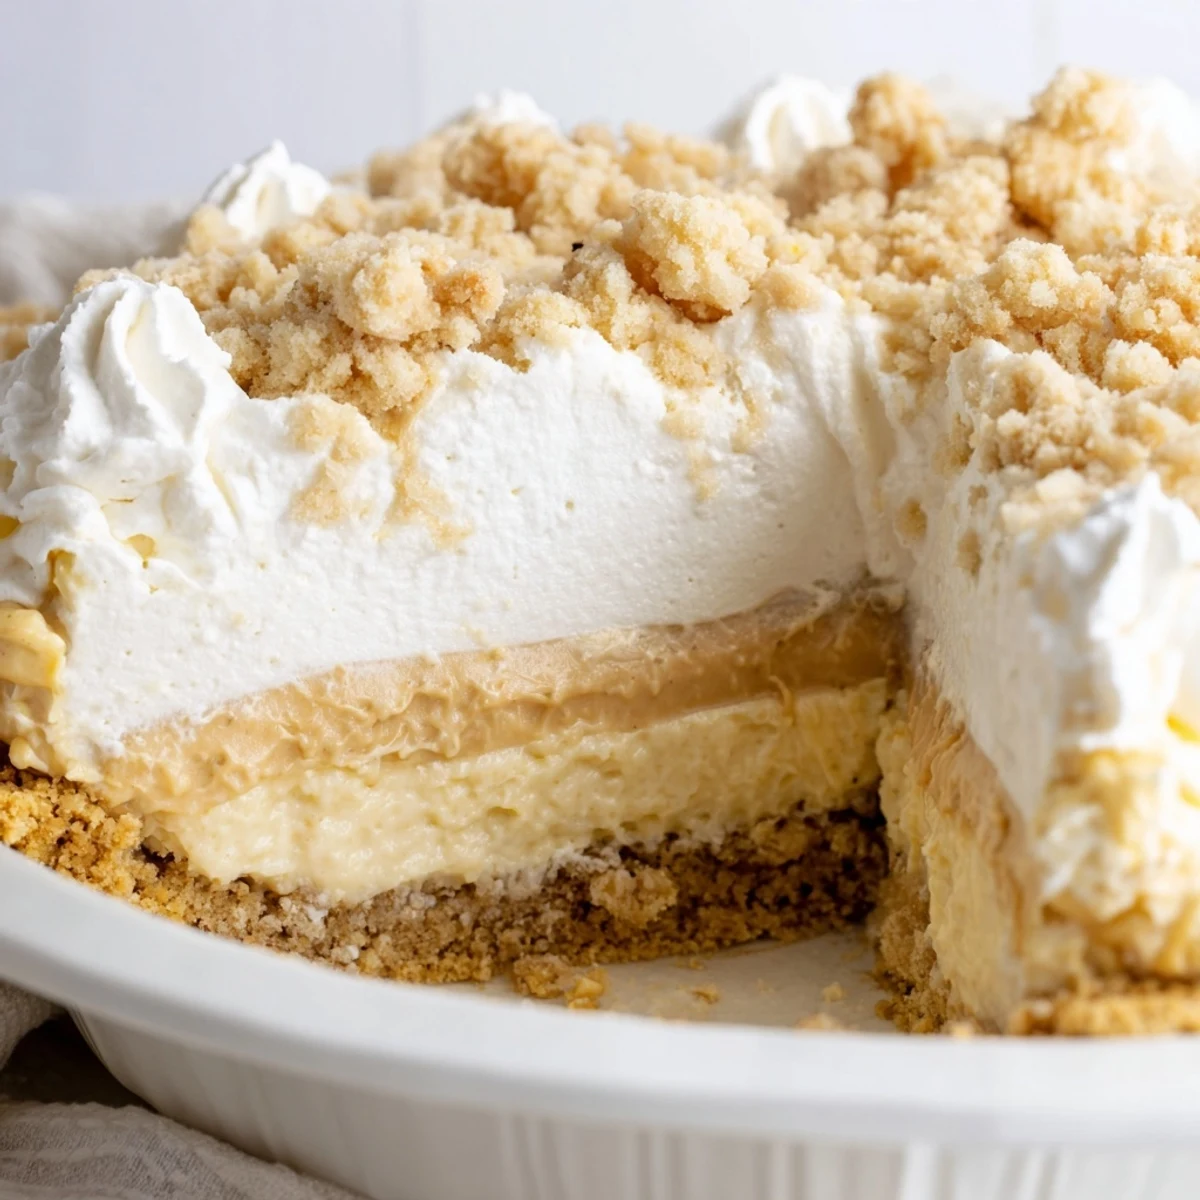
Save This old-fashioned Amish dessert brings together the beloved flavors of creamy peanut butter in a showstopping presentation. The foundation starts with crispy peanut butter crumbs made from creamy peanut butter and powdered sugar, creating a delightful texture contrast. The silky filling is cooked on the stovetop using whole milk, egg yolks, vanilla, and butter—resulting in a glossy, pudding-like consistency that sets beautifully. After chilling until firm, the pie gets crowned with freshly whipped cream and a generous sprinkle of remaining peanut butter crumbs. The entire process takes just over 3 hours including chilling time, but the active preparation is quick and straightforward. Each slice delivers that perfect balance of sweet, creamy, and slightly salty notes that makes peanut butter desserts so irresistible.
The way my grandmother's kitchen would smell when she pulled this pie from the refrigerator still takes me back to humid summer afternoons in Indiana. She learned the recipe from an Amish neighbor who traded fresh eggs for baking secrets, and somehow that simple exchange made every slice feel like something special was being shared across the fence line.
I made this for my daughter's eighth birthday party because she'd developed an obsession with anything peanut butter. The kids were too busy running through the sprinkler to notice much, but when they finally came inside, the room went quiet except for the sound of forks hitting plates. One of her friends asked if I could pack a slice in her lunchbox the next day, which felt like the highest compliment possible.
Ingredients
- 1 9-inch prepared pie crust (baked and cooled): Homemade graham cracker or shortbread adds something wonderful, but store-bought works perfectly fine when time is short
- 3/4 cup creamy peanut butter: The kind you stir from the jar gives the best flavor, though any creamy variety will work
- 1 cup powdered sugar: This creates that signature crumbly texture that sinks into the custard layer
- 2/3 cup granulated sugar: Balances the peanut butter without making the filling overly sweet
- 1/3 cup all-purpose flour: The secret to getting that pudding-like consistency in the custard
- 1/4 teaspoon salt: A tiny pinch wakes up all the flavors and keeps things from tasting flat
- 2 cups whole milk: The higher fat content makes a noticeable difference in the final texture
- 3 large egg yolks: Separate the whites and save them for something else—they add richness and help the filling set
- 1 teaspoon pure vanilla extract: Don't skip this even though peanut butter is the star
- 2 tablespoons unsalted butter: Stirred in at the end for that glossy finish
- 1 cup heavy whipping cream: Cold from the refrigerator works best for whipping
- 2 tablespoons powdered sugar: Just enough sweetness to balance the tang of the cream
- 1/2 teaspoon vanilla extract: Because vanilla makes everything better
Instructions
- Mix the magic crumbs:
- In a medium bowl, work the peanut butter and powdered sugar together with a fork until you have uneven, crumbly bits. They should look like damp sand that holds together when you squeeze it.
- Layer the foundation:
- Press half of those crumbs into the bottom of your cooled pie crust. Don't worry about making it perfect—some texture here is a good thing.
- Start the custard base:
- Whisk the granulated sugar, flour, and salt in a saucepan until no lumps remain, then gradually whisk in the milk until everything is smooth and dissolved.
- Cook until thickened:
- Set the pan over medium heat and whisk without stopping. The mixture will suddenly transform from thin to thick and glossy, usually right as it begins to bubble around the edges.
- Temper those eggs:
- Whisk your yolks in a separate bowl, then slowly drizzle in about a half cup of the hot milk mixture while whisking furiously. This prevents scrambled eggs in your pie.
- Combine and cook again:
- Pour the warmed egg mixture back into the saucepan, whisking constantly. Let it cook for two more minutes until it's thick enough to coat the back of a spoon.
- Add the finishing touches:
- Remove from heat and stir in the butter and vanilla until everything is silky smooth. The custard should look glossy and smell incredible.
- Assemble the pie:
- Pour the hot filling over those peanut butter crumbs in the crust. Let it cool on the counter for 15 minutes before it goes into the refrigerator.
- Let it set properly:
- Refrigerate for at least two hours—overnight is even better. The filling needs time to firm up completely before adding the topping.
- Whip the cream:
- Beat the heavy cream with the powdered sugar and vanilla until stiff peaks form. You want it thick enough to hold its shape when spread.
- Finish and serve:
- Spread the whipped cream over the chilled pie, then sprinkle with the remaining peanut butter crumbs. Cut into slices and watch people's faces light up.
 Save
Save My sister-in-law once ate three slices at a family gathering, which I only noticed because the pie dish looked suspiciously empty when I went to put it away. She tried to blame it on her husband, but the peanut butter crumbs on her chin told a different story. Now I make two whenever she visits, just to be safe.
Getting The Crust Right
A graham cracker crust adds this wonderful buttery sweetness that pairs perfectly with peanut butter. Crush your crackers into fine crumbs, mix with melted butter and a touch of sugar, then press into the pie dish and bake for 8-10 minutes at 350°F. The trick is letting it cool completely before adding the filling—otherwise, you'll end up with a soggy bottom, and nobody wants that disappointment.
Making It Ahead
This pie actually improves with a little time in the refrigerator, so it's perfect for making the day before you need it. The custard firms up beautifully and the flavors deepen, though I'd wait to add the whipped cream topping until a few hours before serving. That way the cream stays fluffy and doesn't weep into the custard layer.
Serving Suggestions That Work
A warm cup of coffee cuts through the richness nicely, or serve it with a cold glass of milk if you want to lean into the nostalgia. Sometimes I'll drizzle a little melted chocolate over individual slices right before serving, just enough to make it feel fancy without overpowering the peanut butter.
- Let the pie sit at room temperature for 10 minutes before slicing—it cuts cleaner that way
- A hot knife dipped in water between slices makes for picture-perfect portions
- Store any leftovers covered in the refrigerator, though they rarely last long enough to worry about proper storage
 Save
Save There's something about the way the cold custard hits those warm peanut butter crumbs that just works, every single time. I hope this pie finds its way into your kitchen and creates its own memories.
Recipe FAQs
- → How long should the pie chill before serving?
-
Refrigerate the filled pie for at least 2 hours until completely set. This chilling time allows the custard-like filling to firm up properly, making clean slices possible. For the best texture, plan to chill it closer to 3 hours before serving.
- → Can I make this ahead of time?
-
Absolutely. This pie actually tastes better when made a day ahead, allowing the flavors to meld together. You can prepare it up to 24 hours in advance—just wait to add the whipped cream topping and final crumb sprinkle until a few hours before serving.
- → What type of peanut butter works best?
-
Creamy peanut butter delivers the smoothest texture for both the crumb layer and filling. Avoid natural-style peanut butters with oil separation, as they can affect the consistency. Standard commercial creamy peanut butter provides the most reliable results.
- → Can I use a store-bought crust?
-
Yes, a 9-inch prepared pie crust works perfectly. Just ensure it's baked and cooled before adding the filling. For extra flavor, consider using a graham cracker or shortbread crust instead of a traditional pastry crust.
- → How do I know when the filling is thick enough?
-
The filling is ready when it coats the back of a spoon and just begins to bubble. This typically takes 4-5 minutes of constant whisking over medium heat. The mixture should have a glossy, pudding-like appearance before removing from the heat.
- → What's the best way to slice this pie?
-
Use a sharp knife dipped in hot water, wiping it clean between slices. The filling is quite creamy, so a warm, clean blade will give you the neatest presentation. Let the pie sit at room temperature for about 10 minutes before slicing if it's been refrigerated for several hours.